UPDATE: Mosquito Net Bed Frame For Camp – Jim Weaver DIY
UPDATE:
The Troop 3 summer camp trip to Pioneer is over and first of all we had a blast as a Troop, probably the most fun we've ever had at a summer camp. So who's ready to hear about how the mosquito netting and frame performed? Here we go.
Meh! OK, OK I'll elaborate.
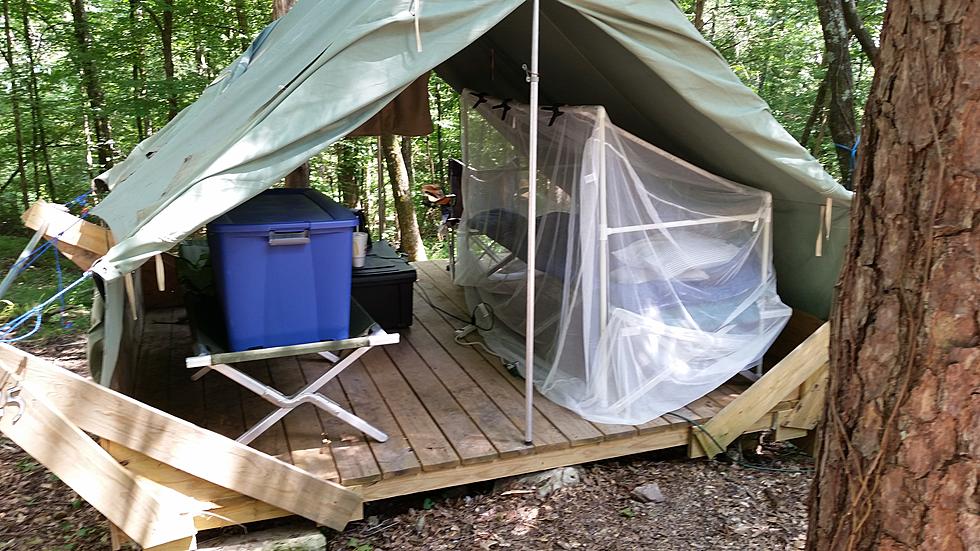
The frame, as you can see in the picture, could have been been much taller. That height might be fine for a 4'6" scout, but for a 6'3" adult, it's too short. When you sit up on the cot you have to slump because you head hits the frame. As you can also see the angle of the tent could have allowed me at least another foot of overall height, that would have been much better.
The frame was a little wobbly, although it hold together just fine, I should have used the 3/4" PVC instead of the 1/2" PVC. That's my fault, I ignored that part of the instructions and went with my gut. Gut was wrong.
When I tried it out the first time it was obvious that airflow might be a problem, so I quickly devised a way to mount my fan inside on the frame itself. That worked kind of. A different fan and mounting system would have worked better, but you have to improvise, adapt and overcome, so I did the best I could.
What I learned after the first night: Airflow was a problem after all, even with the fan inside the netting I was hot and stuffy. Oh and I still got bit by mosquitoes, several bites on my legs which were not in the airflow at all.
What appears to be one of the keys to success, at least for me anyway, was two fans moving the air inside the tent. That worked much better at keeping those dang skeeters off me at night. I also purchased one of those Thermacell devices, they're only $20 now and seem to do a pretty good job as well.
Bottom line, I have a mosquito net and frame for sale if anyone is interested, let me know.
Below is the original DIY project blog and video.
I've been going to camp with my Boy Scout son Tyler for three years now and we're coming up on year number four very soon. Every year I have seen these fantastic mosquito net frames some of the boys from other troops had for their beds and I kept thinking "one of these days I'm going to build one of those," well today, I did.
So I had to start with some kind of plans, even though I've never constructed anything like this I managed to find some terrific plans online. After looking them over the project didn't seem to be that hard and here's the good news, it wasn't.
This is the link to a young man's page called GR8Scouting where I found the plans I used. I'm not sure what his name is, but he did a bang up job on these plans and I can only hope they will fit the bed frames used at Camp Pioneer.
If you're using a standard cot size though, these should work great for you.
I think I mentioned it at the end of the video, but don't even bother with the glue, everything fits pretty snugly and you'll need to totally dismantle it to make it easy to transport, be sure you label the pieces so you don't need the plans in front of your face to reassemble the frame.
The only other thing I did was use 1/2" pvc pipe instead of the 3/4" he recommends in his plans. The 3/4" just seemed a little overkill to me, probably a bad mistake on my part but we'll see if it lasts the week with me crawling in a out of it.
Have a great camping season and good luck keeping the bugs off of you.
More From Majic 93.3